Every astrophotography session requires some level of supervision, typically handled by a computer connected to the imaging setup—more precisely, by the acquisition software running on that computer.
While the choices for both software and computers are vast, in this post we’ll focus on the hardware side of things. Specifically, we’ll look at a common question faced by many astrophotographers: should you use a regular laptop on a table next to the telescope, or opt for a compact mini PC mounted directly on the imaging rig?

Let’s review key aspects of both laptop and mini PC setups—where the advantages of one often highlight the disadvantages of the other.
Cable Management
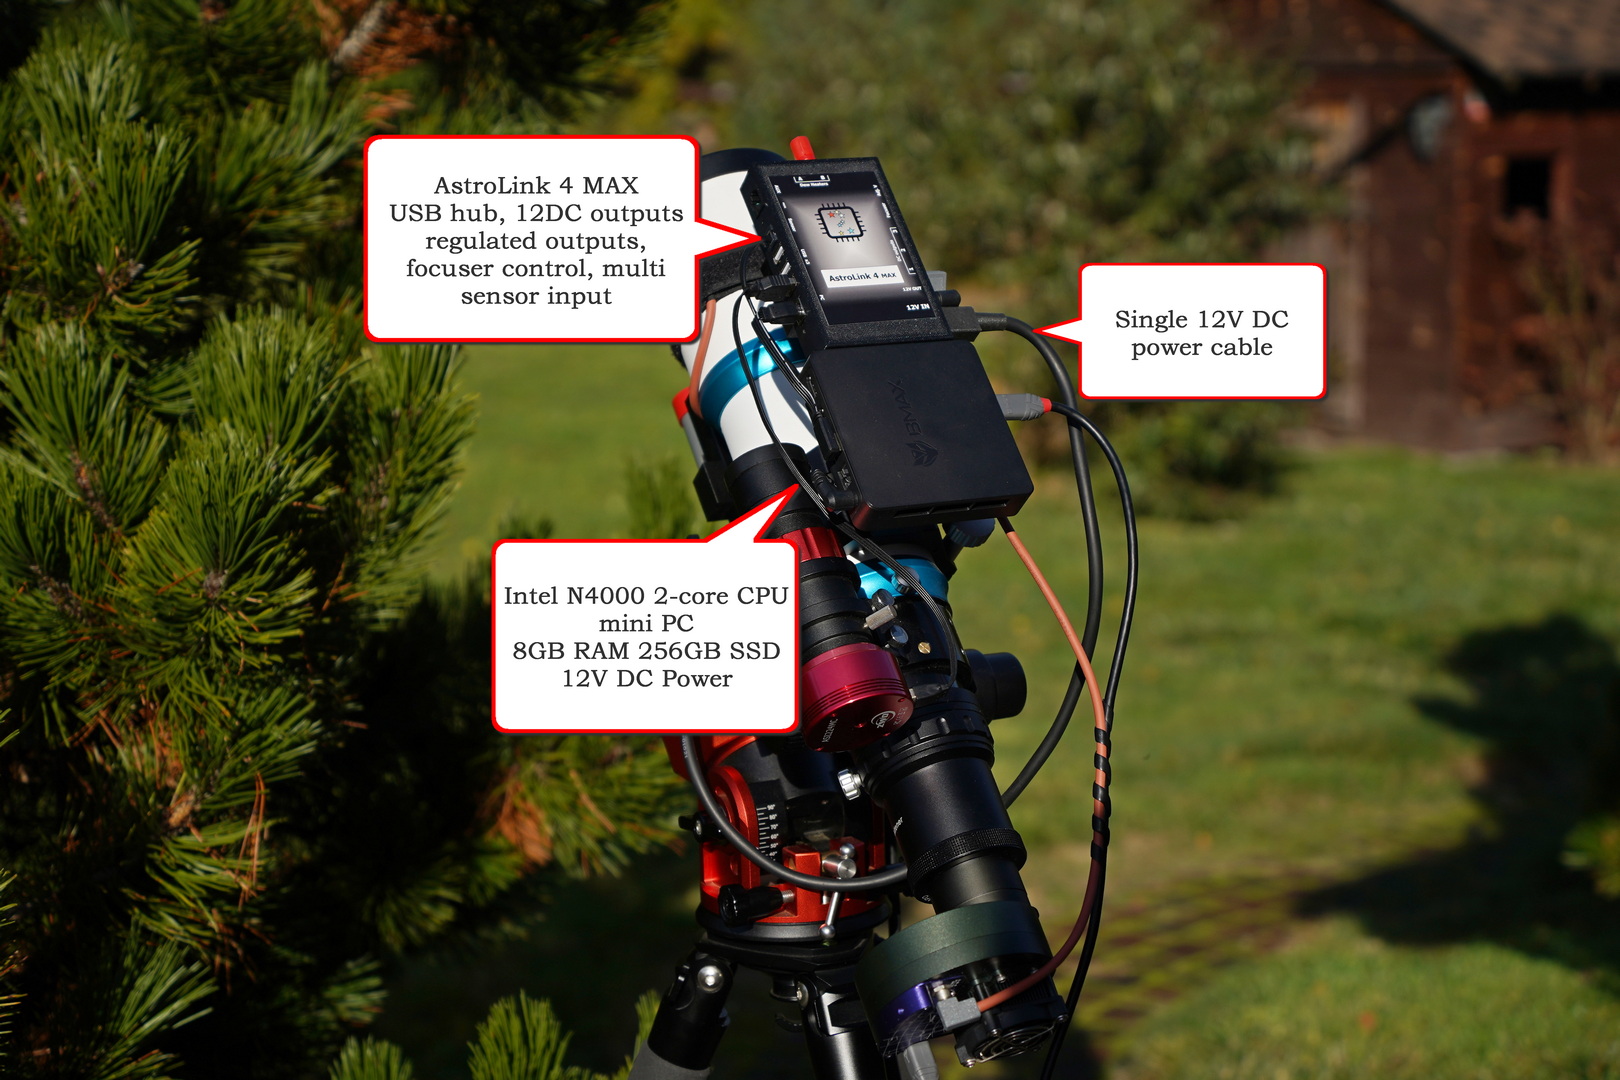
A small computer mounted directly on the astrophotography setup allows the use of short USB cables—reducing cable clutter, minimizing EMI interference, eliminating cable snags, and often removing the need for external USB hubs. Cable management is often an underestimated aspect of the setup. Every cable and connection—whether for signal or power—is another potential point of failure. It is valid for both stationary setups and also for portable and travel rigs.
Performance
The mini PCs are usually powered with 12V DC or via a USB-C power delivery receptacle. Simpler and less expensive models consume little power but offer limited performance. To run acquisition software like NINA or Sequence Generator Pro with guiding, we need at least a 2-core CPU machine with 4GB RAM minimum, while 6-8GB RAM is recommended. A 64GB disk is a minimum, because after several Windows updates, the free space is shrinking quickly, even if we run cleans often. A single imaging session can generate a large amount of data. If we also want to record movies of Solar System objects or do lucky imaging sessions, then we need a more powerful computer. Modern 4-core processors such as the Intel N100 or N150, paired with 8GB of RAM and a 128–256GB SSD, provide ample performance for nearly all astrophotography acquisition tasks. More powerful computers will also work, of course, but:
- They will need more power, so for a portable or travel setup, that may be a problem.
- They will generate more heat, and that is an unwanted effect in the setup.
Additional Costs
Having a mini PC on the setup requires another investment. The prices vary, starting from $100-$120 for the simple models to $150-$180 for mini PCs with a 4-core CPU, 8GB RAM, and a large solid disk. This additional cost is usually small compared to the overall price of a complete astrophotography setup. But there are a few things to consider:
- this additional cost is usually relatively low compared to the whole astrophotography setup
- a dedicated mini PC also protects your more expensive laptop from exposure to the elements—excessive heat, cold, humidity, dust, and dew.
So, in the end, this additional investment can pay off quickly.
Extra Configuration
A dedicated mini PC integrated with an astrophotography setup works without a screen and keyboard connected, so it requires an additional configuration. You need to set up remote access, networking, and power management – like auto start scripts, etc. Some power-saving features should also be disabled—for example, those that turn off the Wi-Fi adapter after inactivity. It is worth having an HDMI cable and a portable keyboard with a touchpad in case of a software failure that breaks the remote connection. This way, you can quickly connect the mini PC to any monitor or TV set and fix the problem.
According to the factors listed above, we can formulate the following statement:
For most astrophotographers—especially those who image frequently or run automated sequences—mounting a mini PC on the telescope and controlling it remotely is the better long-term solution. It offers:
- Fewer cables,
- Greater stability,
- Easier remote operation,
- Autonomy – up to the scenario when all is configured and automatically started on power up,
- And protection for your main computer.
That said, if you’re just starting out or doing short sessions locally, connecting your laptop directly is perfectly fine and simpler to set up.
What else to consider?
Performance
Which mini PCs are good enough for astrophotography? Minimum specs are an Intel Celeron 2-core CPU with 4GB RAM and 64GB disk – that is just enough to run acquisition software; startup may take some time, but performance is stable once running. A mini PC with a 4-core processor (like N97, N100 or N150) plus 8GB RAM and 128-256GB disk is perfectly enough even for more demanding tasks during live stacking or lucky imaging.
Raspberry Pi is another alternative. I strongly recommend the Raspberry Pi 5 with 4 or 8 GB of RAM. A fast SD card is usually enough, but to improve the experience, one may include a solid-state disk drive. StellarMate OS is an actively developed astrophotography package that works just great on Raspberry Pi 5 modules (though the Windows mini PC version is also available – check here).
Power
For astrophotography setups, I strongly recommend a mini PC powered by 12V DC. This voltage is usually already available in the setup, and no additional voltage converters are required. Power consumption is 5-10W for smaller 2-core Celeron-based computers, and 10-15W for larger 4-core N100 machines. Plus, the power that is drawn from USB ports.
Mounting place
I would say the best mounting location is the telescope itself. This way, short cables can be used, and the setup is compact and rigid.
Connectivity
Since the mini PC operates without a screen or keyboard, remote connectivity is essential.
-
With StellarMate OS on a Raspberry Pi, you can easily create a local hotspot, connect a laptop, and control the setup via software like RealVNC.
-
On Windows, creating a hotspot is more complex but still possible. You can also connect the mini PC to your home Wi-Fi network or use a small portable router to link both your laptop and mini PC (you may check this example tutorial on YT)
-
A mobile phone hotspot can also serve as a temporary link—once imaging begins, you can turn it off, and the session will continue.
-
For Windows systems on the same network, Remote Desktop works perfectly, but third-party tools like AnyDesk, TeamViewer, or Chrome Remote Desktop are excellent cross-platform options.
AstroLink
If you’re looking for a ready-made solution, explore the range of AstroLink devices. Options range from simple, compact modules designed for use with an external laptop or mini PC, to fully integrated solutions like the AstroLink 4 Bee (Windows mini PC) and AstroLink 4 Pi (Raspberry Pi 5).