After several years of travel imaging with a 135mm focal length, this image scale stopped being attractive to me and I decided to switch to a longer FL. I have planned something around 200-250mm and also small and lightweight, so it could be handled with a Star Adventurer mount. An obvious choice in this category is RedCat, however, I am too old (or too stupid) for such simple solutions, so after a few evenings of researching I have selected Askar (ie Sharpstar) which has already gained good reviews and not many setbacks. They already have a well-known ACL200 telescope in the portfolio, however, I went 30mm longer and selected FMA230 https://www.askarlens.com/index.php/wap/fma230/250.html – a less known, lighter, and a bit slower telescope. There are 135mm and 180mm versions of the FMA telescope as well.


Telescope has arrived in a pretty hard box with a few papers and a checklist. This is not any certificate of course, but it is good to know that someone actually peeks into it before sending it. Mechanically all looks very good – every element fits precisely, and threads are accurate and blackening without any loss. The focusing ring has no backlash but works quite hard. The focusing range is 20mm, and the proper setting circle is printed on the ring.
Technically speaking FMA230 is a triplet with a 50mm aperture and f/5.5 focal ratio with an additional focal reducer/field flattener 0.84x that according to the manufacturer should cover and flatten up to full frame size sensors. The final focal length is 230mm which corresponds to an f/4.6 focal ratio. All lenses are clean and have proper quality coatings. After removing the reducer a 2″ diagonal can be inserted into the telescope and we can use FMA230 for visual observations. Image quality will be probably superior, however, the aperture equal to the finderscope will not attract many amateurs to use it this way.


The telescope itself with the reducer weighs 1040g, and with complete rings and dovetails it is 1.5kg. When we remove the top handle dovetail we get 1350g. The front and back covers are metal and threaded – good quality, but require a lot of unscrewing.
All elements fit well and seem to be designed well. Mounting rings have side holes to fix more accessories. The telescope has no integrated rotator, but the tube can be rotated in the rings after slackening the bolts. There is a 2″ thread in the back focal reducer adapter where we can put any 2″ filter. However, this single part is not designed perfectly, because there is very little space around the filter and you need to manipulate it carefully to place and remove the filter.


To sum up – the mechanics are very good, and the functionality is good (tight focusing ring, tight filter placeholder).
For quick testing, I have attached to the FMA230 my full frame Sony A7II camera, set backfocus to 55mm as the manual says, attached the setup to Star Adventurer, and put it all outside. After quick polar alignment and focusing I captured the first 15s frame and I was quite disappointed after reviewing it. I expected maybe a bit elongated stars in the corners, but they actually looked like this:

This did not look good at all. But every corner was distorted in a similar way, so I figured out that the backfocus is probably wrong. After some trials and errors I have found out, that backfocus set to 52-53mm covers the full frame with almost perfect stars in the corners. Here is a sample 30s frame after backfocus adjustments.

And this kind of correction is perfectly acceptable to me 🙂 There is some small but intense vignetting in the very corners of the full frame – I do not know what was the source of it. If that is the optics itself, or the extenders I used, or maybe 2″ filter placed directly behind the reducer.

After back focus adjustments clouds came quite quickly and I managed to capture only a few more frames of the comet.

There is a visible halo around brighter stars due to the high clouds which were already present in the sky.
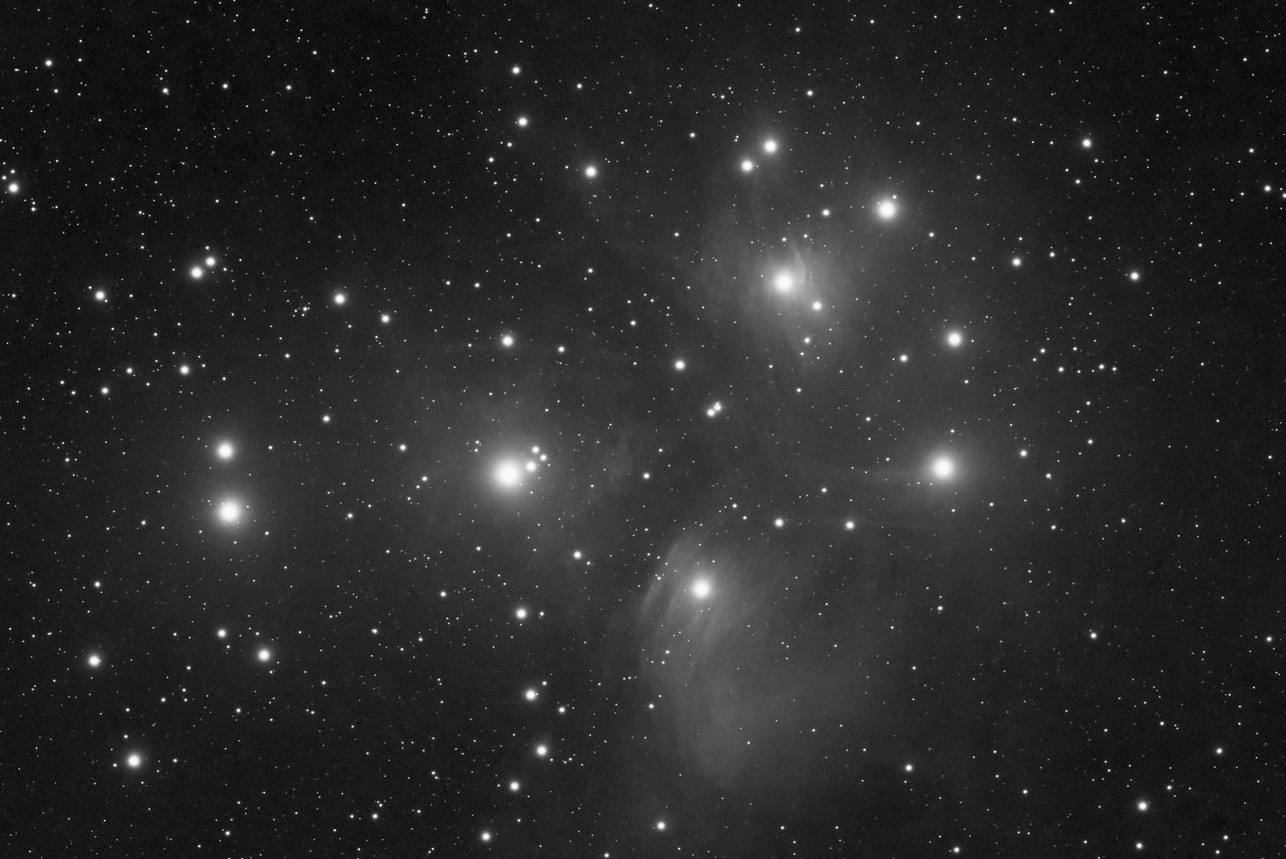
The night after I attached to Askar FMA230 PlayerOne Saturn-C camera (IMX533 sensor) and captured 60 minutes of the Auriga center, unfortunately also through the high clouds. There is a noticeable color difference between the blueish reflective nebulosity in IC405 and the greenish oxygen-based emission nebulosity in IC410.

And the last test image – this time with QHY268M APS-C format camera and L filter – only 10×2 minutes of the frames. Without any calibration, so I tried to remove vignetting in postprocessing, but the outcome is not perfect.

The overall detail level is quite high – despite the modest 50mm aperture of the telescope and the demanding 3.75 microns pixel size of QHY268M.
So here are my final thoughts after a few short sessions with Askar FMA230:
I like:
- compact size and lightweight
- mechanical design and craftsmanship
- focusing ring precision
- mounting rings with many options
- full frame coverage with minimal vignetting and minimal distortion in corners
- good resolution
- good color correction despite the fact no fancy glass was used in the optics
I liked less:
- backfocus problems – 55mm given by manual was not good in my case, 53mm after adjustments gave the best result
- focusing ring tight movements
- filter placeholder – little space around the filter
Clear skies!


Nice Lucas. What made you give up at 135mm with your Samyang?
Thanks Stephen! I wanted both more focal length and also some changes 🙂
On your first shot, where a back focus of 55 mm gave you these weird elongated stars, which corner of the frame did you put in here (left/right up/down)? I.e. did the outer stars form an O-shape or an X-shape?
I am asking, because I bought a used FMA230 recently and also ran into a back focus problem (thanks to the previous owner who did not tell me about that!). I came across this page when searching for others with the same issue (hoping to reduce the time needed to find a solution). In my case (55mm backfocus with APS-C sensor) the outer stars form an X-shape.
It is a top left corner, the stars were elongated symmetrically from the frame center.
I have once seen such X-shaped stars with William Optics Zenithstar 80 II ED and old WO Flattener III 0.8x. This model was not dedicated to that refractor, and I suspect that the strange star shape was a combination of elongated stars and astigmatism. After some iterations of backfocus adjustments I was able to minimize this effect and stars in corners were almost okay.
What adapter did you use to achieve the correct backfocus with your Sony Camera? I also have a sony e mount camera and it is hard to understand sometimes how o get the correct 55mm backfocus. Thanks
Hi, I used a regulated M48 adapter to check the correct backfocus – that was about 53mm for me. Then I got two M48 adapter and 1+2mm shimmers to get the permanent correct distance.
In my case 55mm distance was not correct – the stars in the corners were elongated, as you may check in the images above.
I have a question; in the photo above you have some attachments on either side of the scope rings, do you happen to know the type of the screws needed – Askar makes no mention of either
their size or length?
Ive tried a bunch of M’s … seems like the outer “pair” are M4 not sure what the larger middle is?
T.I.A
– Larry
Hi Larry,
I do not remember, and I cannot check it now. I am 99% sure these screws must be either M4, M5, M6, or imperial 1/4 inch thread.
Definitely, some of them are M6, because I am sure I used that screws to fix some equipment to these brackets.
Lucas